Timber fences make attractive and secure property boundaries. With the right tools and materials, anyone with basic DIY skills can do it. This article will walk you through installing timber fence posts so you can do it quickly and easily.
Timber fencing is a unique way to decorate your yard. A well-crafted wooden fence transforms any yard or garden and adds value to your home. To make your fence weatherproof, install the posts properly. Luckily, installing these posts is easy, just follow my guide.
Let’s begin. I’ll show you how to install those beautiful wood posts yourself, giving your backyard a stunning new look without breaking the bank. Start our innovation journey by learning how to install timber fence posts.
I want to properly install a timber fence around my property. Breaking down fence installation into manageable steps makes it easier. Installation materials first.
Posts, post hole diggers or augers, and fencing panels are needed to build a fence. Treated pine lumber prevents rot in posts. Post hole diggers or augers make post holes easy. Fence panels offer privacy and security. Let’s discuss how to prepare the area before installation now that we know what materials are needed.
Wooden fences require special materials and tools. Choose the fence posts first. Wood, concrete, or treated pine posts are available. Treated pine is most popular due to its affordability and ease of installation. It can be used anywhere, but prolonged moisture exposure may require more maintenance than other woods. Although more expensive than wooden posts, concrete posts are popular because they are stronger and more stable. Cedar, redwood, and pressure-treated wood posts all have advantages depending on your fence project’s style.
After selecting a fence post material, gather post hole diggers, trowels, levellers, wire cutters, saws, and drill bits (depending on how large your holes will be). Drills and saws require gloves, eyewear, and hearing protection. To secure each post after it’s planted, buy bags of quick-setting cement mix. This ensures maximum strength and durability against harsh weather over time. Finally, add gravel around each post to improve drainage and prevent water damage. These materials let anyone build a sturdy wood fence.
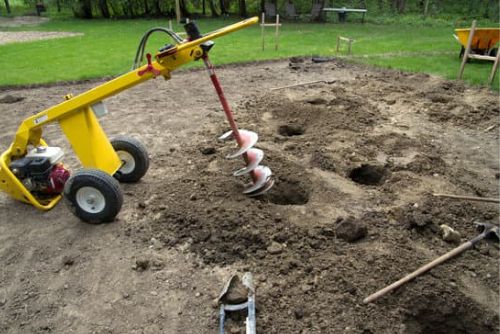
Digging and setting post holes is an important step in installing a timber fence. It can be hard work, but it’s essential for creating a secure foundation for your new fence. Here are some tips on how to get the job done:
After digging holes, set posts. Use concrete mix or other support material to secure each post in its hole. Install your fence with level posts. Use a spirit or laser level to align everything for the best results. After these steps, your fence posts should be securely planted and ready for measuring and cutting.
I’ll measure and cut my fence’s timber posts. First, I string a line along my fence’s path to guide post placement. Using this reference point, I can mark and cut the posts. For a straight fence, this step must be precise. I use my diagram’s measurements and add 10mm for digging and settling to make sure each post fits perfectly. I cut each post with a saw and set them aside until installation after double-checking all measurements. My posts are ready after precise measuring and cutting.
After cutting and measuring my posts, I’ll secure them. This is essential for a long-lasting fence. Start by leveling each post. Dig a hole big enough to fit the post. The post’s depth should be one-third of its height plus 6 inches for stability.
After digging the holes, install each post. Before doing this, I’ll add crushed gravel around each post’s base to keep water away from wood or metal in contact with soil, making the installation last longer. After that, I’ll pack dirt back into each hole until it’s just below the post’s top edge before adding concrete mix and letting it settle overnight. After 24 hours, the mix will harden and secure my posts.
After installing posts, add rails. I start with line posts at each end of my run and work inward. I’ll measure my fence length and subtract two post widths. This will accurately measure how many line posts I need between the ends. Then, using string and stakes or spray paint on the ground, I mark where each line post should go by measuring across the end post.
After marking my measurements, I can start inserting line posts. Follow your local building codes for depth—some states require up to three feet. After installing all line posts, I’ll install top picket pieces along each rail section.
The top pickets were installed after the posts and panels. I measured and cut two-by-four fence rails. I then nailed each rail to the wooden posts with galvanised nails, using a post set or concrete blocks.
Next, I measured and nailed my pickets along each rail. I used a spirit level to hammer them in one by one to ensure they were level on both sides of the fence. I screwed in some pickets for extra security.
After everything was secured and leveled around my new timber fence, I knew it would look great. After re-levelling any posts that had shifted due to weather or other factors, this project was nearly finished.
After installing the top picket pieces, finish up. First, level your posts. This ensures a secure, even fence. Use a post level or another tool. Check each post’s grounding. Before continuing, add more soil or gravel around the post’s base to secure it. You can even include screens on top of your timber fence to help create additional height or privacy.
After checking and leveling your posts, add gravel, dirt, grass seed, or mulch along the fence line. This prevents weeding and finishes it. After everything is level and everything looks good, double-check your posts one last time before calling it done.
Rapid-setting cement helps install fences. It strengthens posts and speeds up installation. This streamlines fence installation for DIYers.
Rapid-set cement allows you to proceed without waiting for traditional concrete to cure. I built my fence quickly and easily using this method. This cement bonds well with wood, steel, and aluminum, making it ideal for any fencing structure.
Rapid-set concrete kept my new fence posts from shifting or wobbling. Since there are so many timber types, it’s worth considering if you’re looking for a reliable fence post installation solution.
When it comes to selecting the right timber for a fence, there are lots of options. Here’s a list of some commonly used woods:
Pine, one of the cheapest woods, is available at most lumber yards and home improvement stores. If cost is your main concern when building a wooden fence, that’s great. Pine weathers faster than cedar or redwood, so you may need to replace it more often.
Cedar is another popular fence wood because it naturally resists decay and rot without stains or sealants. Cedar posts are more expensive than pine but last longer and require less maintenance due to their natural durability and strength.
Due to its beautiful colour, texture, and longevity when properly maintained, redwood has been used for fences for decades. This wood is expensive and needs regular staining and sealing to prevent moisture damage from rain and snow.
Finally, spruce is affordable for fencing projects but lacks the weathering and insect resistance of cedar or redwood, which could damage your investment. However, with proper construction, spruce can last for years and be cost-effective.
In order to ensure long-term stability, each type of wood you choose for your fence project requires specific tools and techniques during installation, which we’ll discuss in our next section on installation tools.
Install your fence after choosing the wood. This section covers timber fence post installation tools. Start with hammers, drills, and saws. Posts with galvanised spikes or brackets set into concrete will secure each post to the ground. It is important to prepare these tools before learning how to install timber fence posts.
Post-installation follows. Mark each post’s location, spacing them evenly and aligning them straight. After marking all the posts, use a shovel or auger to dig deep enough to set them in concrete with the tops level with the ground. After clearing each hole, fill it with concrete mix and let it dry before installing your post fence. Finally, secure each post with screws or nails and test for stability by testing for wobble or give under side-to-side movement.
After installing all posts, you can attach fencing panels between them—but only after checking your work. Too little cement around the base of each post can weaken it over time; incorrect alignment can cause gaps between panels; and uneven spacing can create an unbalanced look. Avoid these mistakes to succeed.
Installing timber fence posts can be a tricky job, and there are common mistakes that should be avoided. Here’s what I’ve learned over the years:
These simple tips will help your fence last without any surprises. Let’s discuss installing your new timber fence posts safely and easily.
Properly installing a timber fence is easy and safe. Plan the line post placement first. Before digging or mixing concrete, decide where to put the posts. After determining line-post locations, measure and spray-paint them to ensure equal spacing.
Next, use a shovel or auger to dig post holes. The post should be 600mm deep to allow for pouring concrete around it. Fill each hole with gravel before inserting the wooden post to improve drainage and support your fence panels. Finally, use ready-mixed concrete to secure posts that won’t move due to weather or ground movement.
With these tips, installing a timber fence should be easy—but don’t forget maintenance. Checking for rot and pest damage can help your new fence last for years.
Once the fence posts have been installed, there are a few key maintenance requirements that must be met in order to ensure they remain secure and sturdy. Here is a list of things I recommend doing:
Make sure you budget for annual maintenance to keep your timber fence posts lasting. Even treated timbers can weather and deteriorate without proper care, requiring costly repairs. With these simple tips, you’ll find that basic upkeep doesn’t take long but is worth it for preserving structural integrity and visual appeal for years to come. Let’s look at some timber alternatives…
Alternatives to timber posts exist. Sometimes wire ends can replace wood. These wire ends are strong and secure. Steel poles with mounting brackets are readily available and require less maintenance than wood posts. Steel poles are pre-drilled for easy installation.
Plastic composites can replace cedar or redwood. This fencing material is durable and low-maintenance. Plastic composites are cheaper to install than metal posts.
These materials are eco-friendly and longer-lasting because they don’t use trees or other natural resources. Choose one of these timber fence post alternatives to save money and the environment.
With the right information and help, installing a timber fence isn’t scary. I installed my own timber fence posts with careful planning, cost-effectiveness, and safety. I felt more confident about tackling this project after researching fencing materials and weatherproofing methods.
I took all necessary precautions, so the process went much smoother than expected. The most crucial part was spacing the posts evenly. Professional advice allowed me to ask questions throughout the installation process, which was invaluable.
Installing a timber fence requires research and planning. However, with proper cost-effectiveness, safety, and weatherproofing, you can enjoy a beautiful wooden fence around your home for years to come. This insightful article gave you the ideas and preparations on how to install timber fence posts.
Installing a timber fence isn’t always the cheapest option. When comparing options and maximising value, there are several factors to consider. I’ll help you decide how to install your new fencing by highlighting some key factors.
First off, let’s take a look at the materials available:
Do you want to install your fence posts yourself or hire a professional? Doing it yourself may save you money, but remember that you’ll need to buy tools and equipment and account for extra labour hours if something goes wrong. Hiring a pro gives you peace of mind that everything was done right. This route usually requires upfront fees.
After considering all these factors, it’s important to consider local regulations, which may require specific fencing materials or safety measures like adding height barriers for children. Check the laws before proceeding to avoid unnecessary fines.
Installing a timber fence requires deciding whether to hire a professional. Depending on your budget and timeline, this can be crucial. Thankfully, many professionals specialise in this type of work, so you can get the job done right without any hassle.
Hire a professional with wood fence installation experience first. Many contractors can install vinyl or metal, but they may struggle with wood. Ask about their timber fencing projects and installation methods. You’ll know what to expect afterwards.
Hiring a contractor to handle all project aspects efficiently and professionally saves time and money. They can securely install posts to keep your fence strong. If something goes wrong during installation, you can call your contractor to fix it quickly and easily.
Finding someone to install your timber fence is possible, but you must do your research to make sure they can do quality work at a reasonable price. Doing this extra legwork upfront will prevent you from wasting time and money on inexperienced amateurs who would ruin your beautiful new fence.
If I build a timber fence, can I use the same wood for posts and rails? This affects the fence’s strength and longevity. After researching, I found that using one type of wood may be cheaper than buying two.
Durability is key when choosing wood. Cedar and redwood last longer outdoors than pine and spruce. Due to their physical properties, some species are better suited for rail or post applications. For rails, softer woods are easier to cut without splintering, while posts are better made from harder woods because they’re less likely to warp over time.
While using the same wood throughout your fence project can save you money, you should avoid using a cheaper variety that won’t weather well. Before making any decisions, ask home improvement stores or experienced professionals about which materials would work best for your needs and climate.
Protecting timber from the elements is an important step in ensuring that your fence posts last. There are several ways to protect timber and make sure it stands up against the weather and other environmental factors. Here’s a quick rundown of what you can do:
I’ve used many of these methods to install my own timber fences, and they still look good after years. If you want your posts to last, wrap them. Water repellents reduce maintenance costs by preventing premature deterioration caused by exposure. You’ll have peace of mind knowing your fence won’t easily succumb to nature.
When installing a timber fence, it is important to consider safety precautions. I have laid out three key pieces of advice that you should keep in mind when installing your own timber fence posts:
Additional steps can be taken to protect the timber fence posts from the elements. Applying a waterproof sealant to prevent moisture damage or checking for mould decay could be beneficial in the long run. Use quality materials like weather-resistant treated wood.
After everything is set up and securely fastened, check all connections one last time to make sure nothing moved while setting up the posts. If something wobbles after installation, this simple precaution can save you lots of trouble.